make 2d drawing from sketchup 3d model
How to Create Your First 3D Model in SketchUp: A Beginner-Friendly Introduction
SketchUp is a 3D modeling software for creating geometric 3D objects such as architectural models, calibration models, interior design items, and functional parts. Information technology's a program that gives you lot the perfect mix of simplicity and quality: SketchUp is known for its user-friendly interface and like shooting fish in a barrel learning curve. Upon completion of the exercises in this beginner's guide to SketchUp, you lot will know the essential tips and tricks to create your own models in SketchUp. Then let'south become started and learn the basics of this great 3D modeling software!
This tutorial by All3DP's SketchUp expert Mich Judelag will help you understand the basics of this powerful 3D modeling software. He volition show you how to build a unproblematic 3D object and how to employ basic commands and tools in order to turn your ideas into the third dimension.
In this tutorial y'all will acquire the very basics of SketchUp, including:
- How to prepare your workspace and get started
- How to draw bones 2D shapes (lines, rectangles, circles, arcs)
- How to turn a 2D shape into a 3D object
- How to motility, push, pull, cut, rotate, scale, copy and delete objects
Prepare, steady, become!
Footstep i: Download the Software
To download SketchUp, get to https://www.sketchup.com/download, follow the steps, and fill up in the necessary information.
 SketchUp is available both equally a freeware version and a paid version with additional functionality, SketchUp Pro. Basically, both versions are the same when it comes to bones commands and tools for modeling.
SketchUp Costless is platonic for beginners, while SketchUp Pro is for advanced users. The former provides all the commands yous tin can use for 3D modeling, and the latter provides additional functions similar press in scale or exporting/importing to/from CAD software.
Footstep 2: Prepare the Workspace
SketchUp allows you to select the workspace you want to utilize from a window that appears when yous open up the awarding. The window shows iii tabs: Learn, License, and Template. The Template tab displays a list of dissimilar presets to select from. They depend on the type of model yous will be doing.
The presets/templates vary in backgrounds and edge styles – which simply affects the visual aspect of your model (i.due east. background colour and line thickness), type of model to be done (i.e. landscaping, interiors etc.) and measurement systems (Majestic or Metric). I recommend that yous explore these templates, only for now, let us use the Uncomplicated Template – Meters.
Click on the template and then on the push button Start using SketchUp on the lower right side of the window. I recommend you lot to check the box on the lower left side that says Ever testify on startup, every bit this will enable you to select any template every time y'all open the application.
Pace 3: View the Most Important Tools
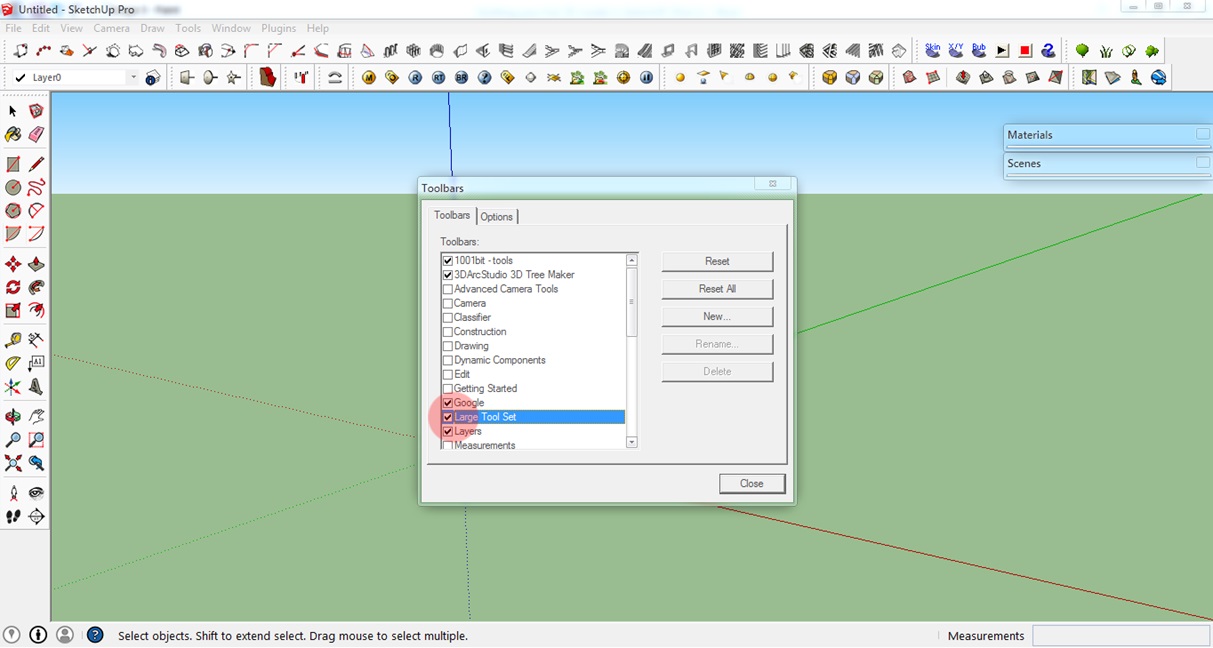
SketchUp has a lot of commands and tools that yous can select from. On your first SketchUp workspace, you will run across default toolbars on the upper role of your screen. At present click on View > Toolbars.
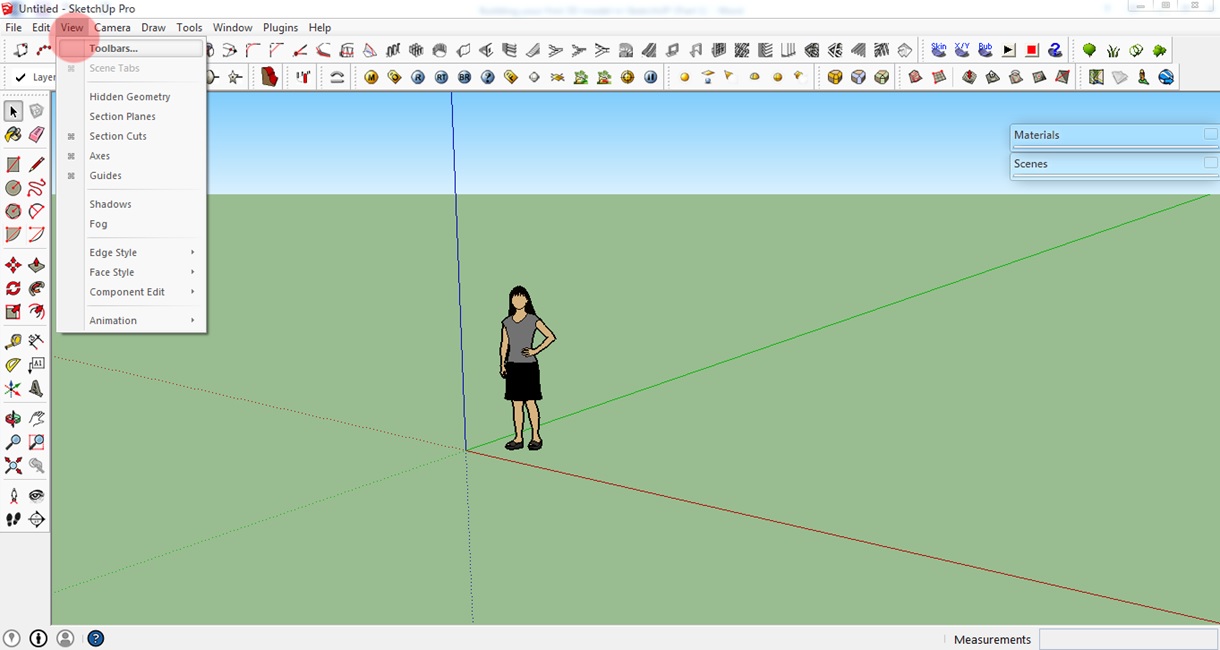
A window volition announced with a listing of toolbars. For this tutorial, nosotros will use the Large Tool Set. This toolbar contains almost of the tools you need to build a 3D model. Check the Large Tool Gear up. I recommend you uncheck the other toolbars to avert confusion.
Pace 4: The Axes
SketchUp utilizes the Red, Dark-green, and Blue axes in the workspace like any other 3D software. This allows you to view your work from different angles.
Also, SketchUp has a snapping characteristic that helps yous align your lines or models along the dissimilar axes.
At present that we have our toolbar gear up and see the 3-dimensional space with its 3 axes in front of us, let's kickoff creating our showtime 2D shapes.
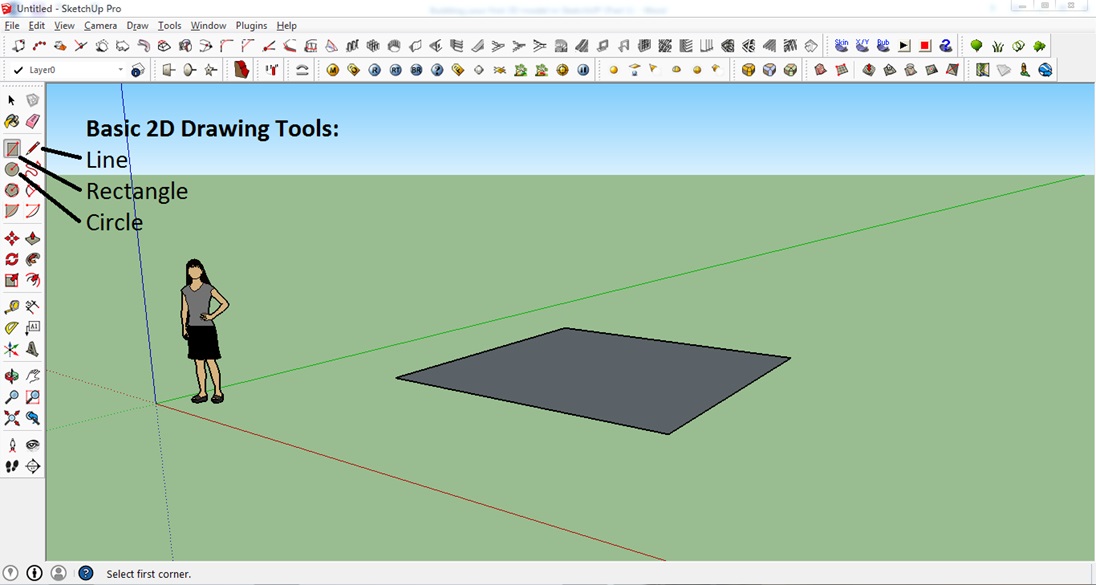
Footstep 5: Basic 2d Drawing – Lines, Rectangles, Circles
To get started, let's depict Lines, Rectangles, and Circles. These are the fundaments of our (futurity) 3D models.
Drawing a line:
1. To draw a line, outset click the Pencil symbol on the toolbar or just press L on your keyboard
2. Click anywhere on your screen to assign the offset betoken
3. Elevate the mouse to the desired location of the second bespeak and click
iv. To specify the length (in this case I entered five), simply blazon the value correct after Step 2 and press Enter
As you have probably already noticed, you lot can align whatever line to the Cherry-red, Green, or Blue centrality of the workspace.
Cartoon rectangles/squares:
ane. To draw a rectangle/foursquare, first, click the Rectangle icon on the left beside the pencil symbol or simply press R on your keyboard
two. Click the desired location to assign the kickoff corner of your rectangle/foursquare
3. Drag the mouse to the desired location for the opposite corner and click
Y'all tin also enter the length and width of your rectangle/square: enter the values after Step 2 and hitting Enter on your keyboard. This part is a fleck tricky. The first value y'all enter corresponds to the length/width along the Red axis and the 2nd value corresponds to the length/width along the Green centrality. Enter the values like this: iv, 4, Enter.
Drawing circles:
1. To draw a Circle, first click the icon below the rectangle icon or just press C on your keyboard
2. Click the desired point to assign the midpoint of your circle
3. Drag the cursor anywhere on the screen to make the circle and so click
4. To specify the radius (i.e. radius = two), simply enter the value right later on Pace 2 and printing Enter
Stride half dozen: Movement Controls
Let's learn how to change our view with the basic movement tools of Pan and Orbit.

Pan:
1. To utilize Pan, click the icon or simply press H on your keyboard
two. Click to gear up the origin, concur the mouse button and only drag. This will allow you to move your view
Orbit:
one. To apply Orbit, click the icon on the toolbar or but press O on your keyboard
2. Click anywhere, hold and drag to rotate the whole view
three. You lot tin can too use the mouse bicycle to Orbit
Step seven: Existence on the Safe Side – Undo and Saving
If you fabricated a mistake just click on Edit > Undo and you will be taken back to your previous step. You can likewise press Alt + Backspace to reach this.
In social club not to lose your progress, brand certain to save your file from time to fourth dimension. To practice this, click File > Save or simply press Ctrl + S on your keyboard. Enter the filename and select the directory yous want your file to be stored in.
Step 8: Making Your Starting time 3D Object
Nosotros've already created second shapes. Let's turn them into 3D objects!
1. Beginning, zoom in on 1 of your 2D shapes by using your mouse wheel button
ii. Click the Push/Pull icon on the toolbar or only press P on your keyboard
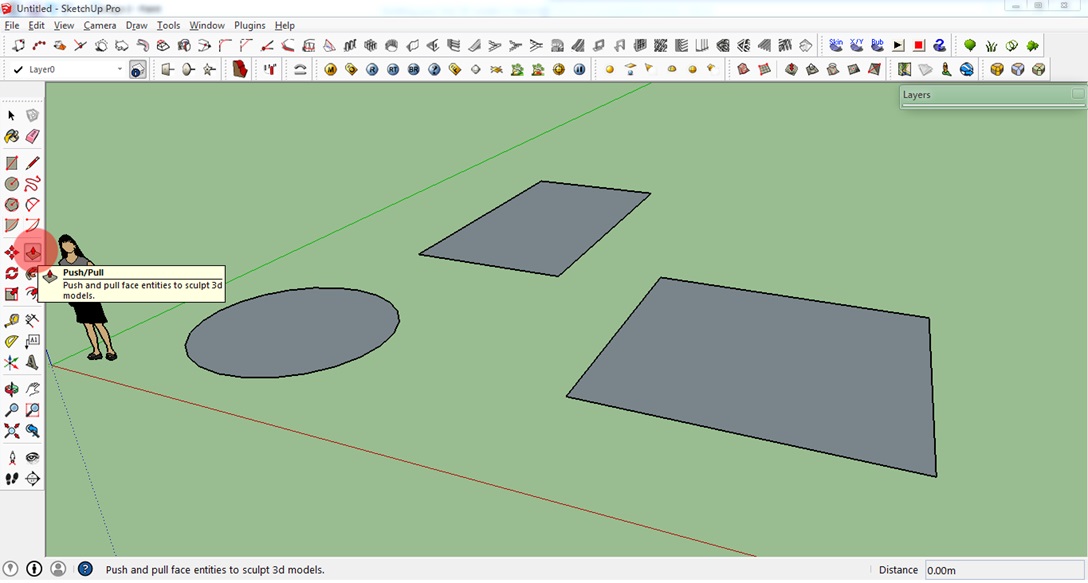
three. Hover your mouse cursor over the plane of the circle
four. When y'all see the plane is highlighted (i.e., when the plane shows a dotted texture on information technology), click on it and merely drag information technology upward. Click the left mouse push button over again to prepare the acme of your cylinder, cube or cuboid. Or type the meridian subsequently the first click
You will and so see that the 2d shape has converted into a 3D object. Congratulations! You lot have created your kickoff 3D object!
Pace 9: Dimension Tools
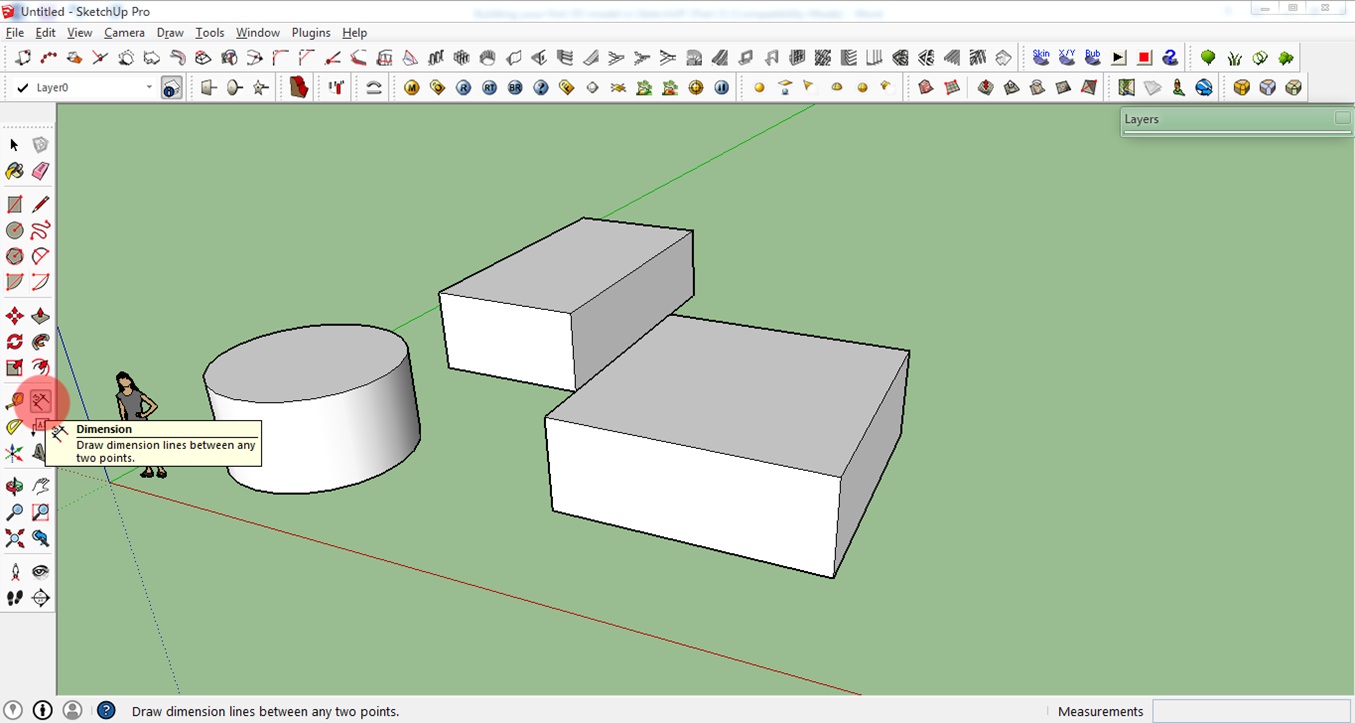
This tool allows you to check the dimensions of your model.
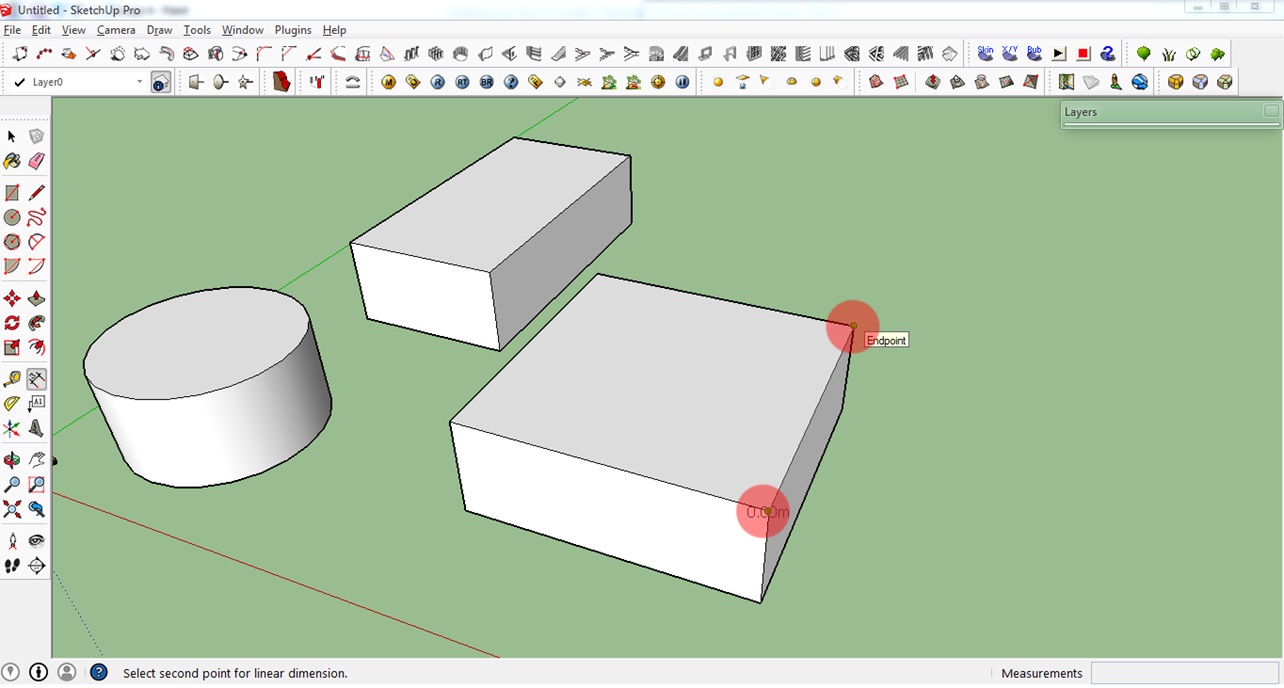
i. To use this tool, only click the Dimension icon on the toolbar
2. Adjacent: either click the starting point and then the finish point of the line you want to mensurate. Or simply click the line. You will and so see the length of your line or object
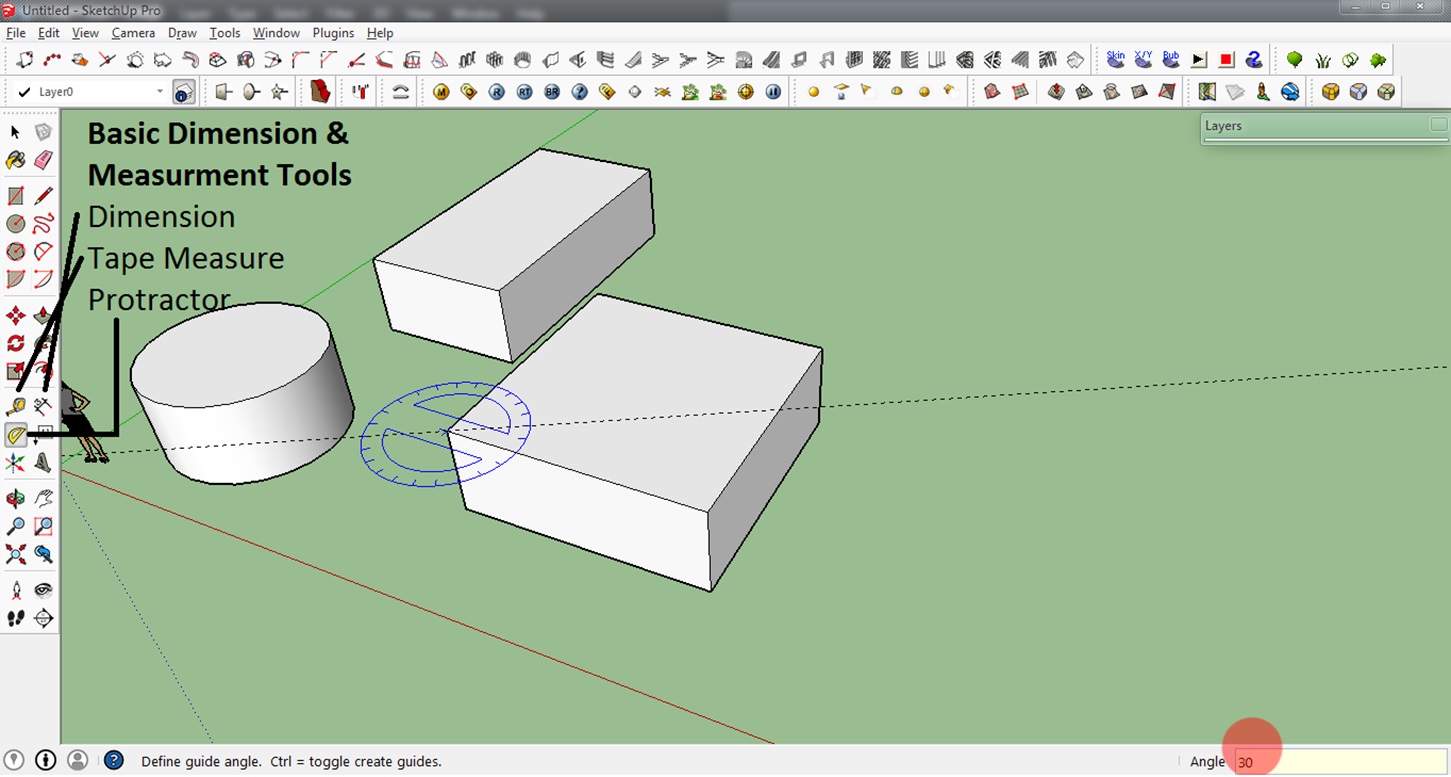
You can also utilise this Tape Measure out Tool to mensurate distances more freely and the Protractor Tool to check different angles. The best way to acquire how to employ these tools is by playing around with them. You can run into the results of the Tape Measure out Tool and the Protractor Tool in the lower right corner (run into screenshot below).
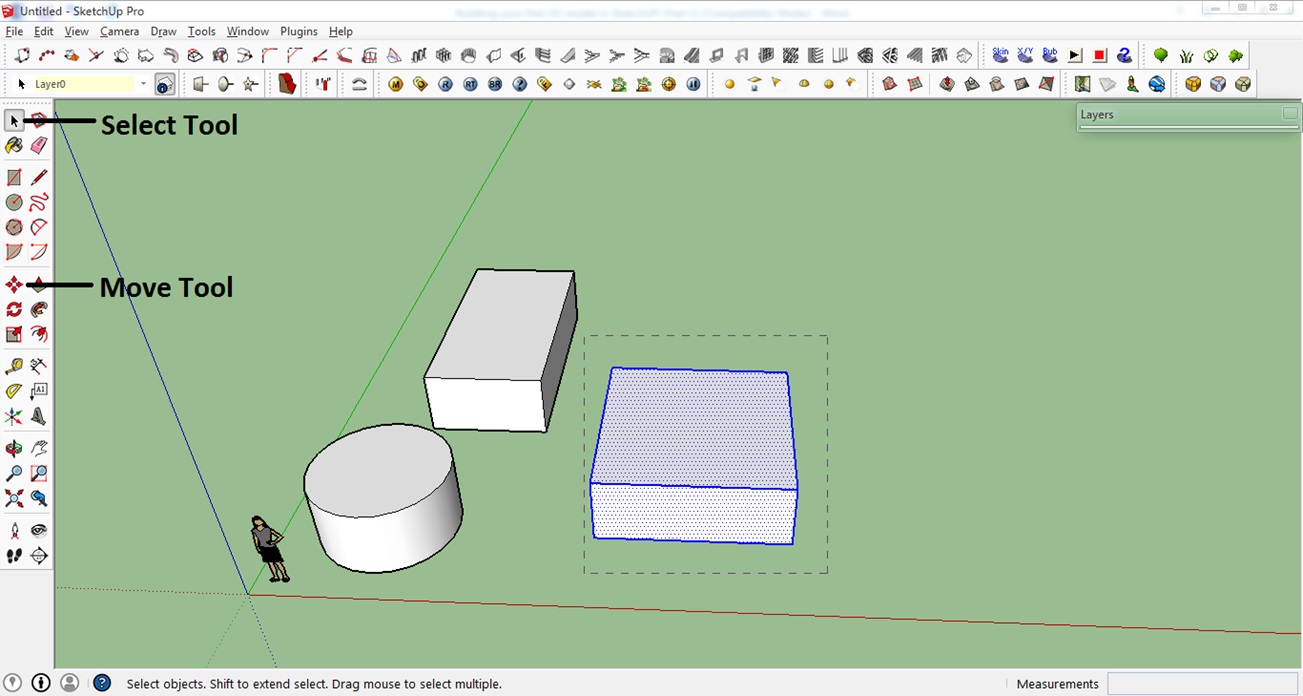
Step ten: Moving and Maneuvering Objects
This tool is very easy to utilize:
1. Showtime select the object y'all want to move. Practice this by clicking on the Select tool and 'drawing' a selection net effectually your object
ii. Click the Move tool or but press M on your keyboard
3. Click the selected object and drag it. Simply click again when you accomplish the desired location
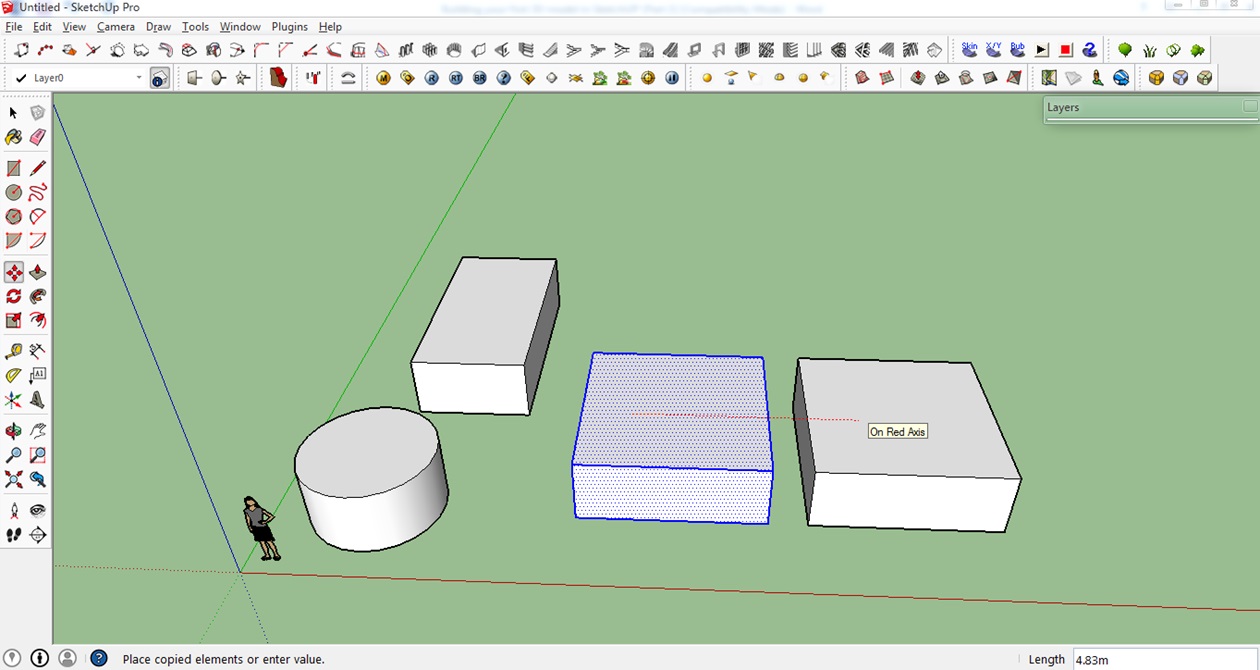
Step 11: Creating Copies of Your Object
ane. To create a copy of your object, select information technology once again (every bit seen only to a higher place)
2. Press Ctrl on your keyboard to create a copy of the model
iii. Left-click once more to place the copied model in the desired location
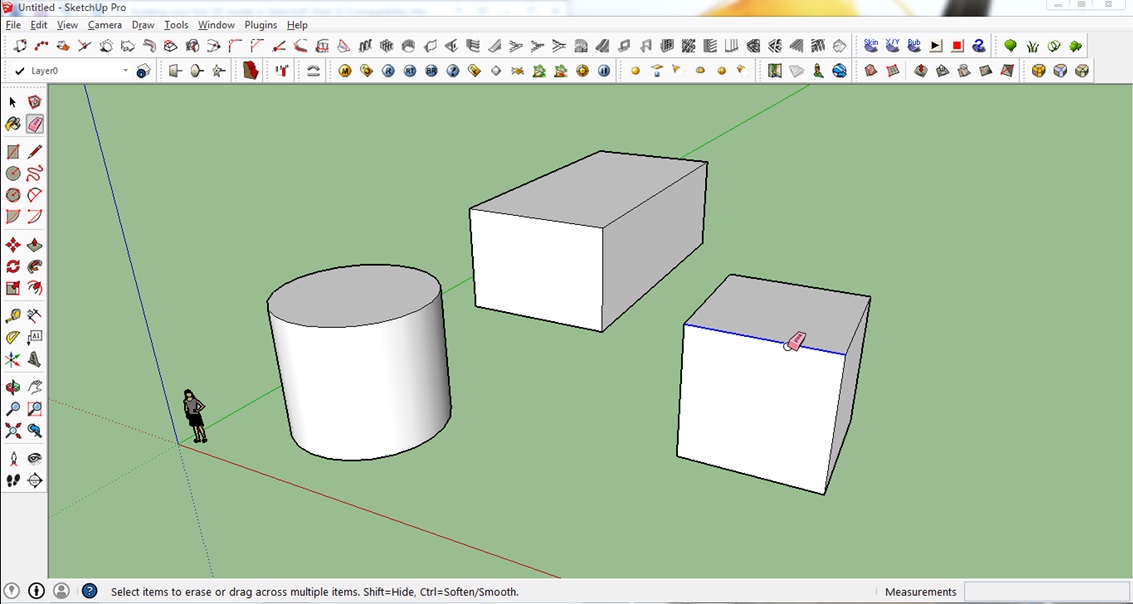
Step 12: Erase Tool
This tool works like a bones eraser: it erases lines or planes you lot have created.
1. Starting time click on the Eraser tool on the toolbar
2. Once the eraser icon appears, click on the lines yous desire to erase
(you tin also select a line with the Select tool so hit the delete button)
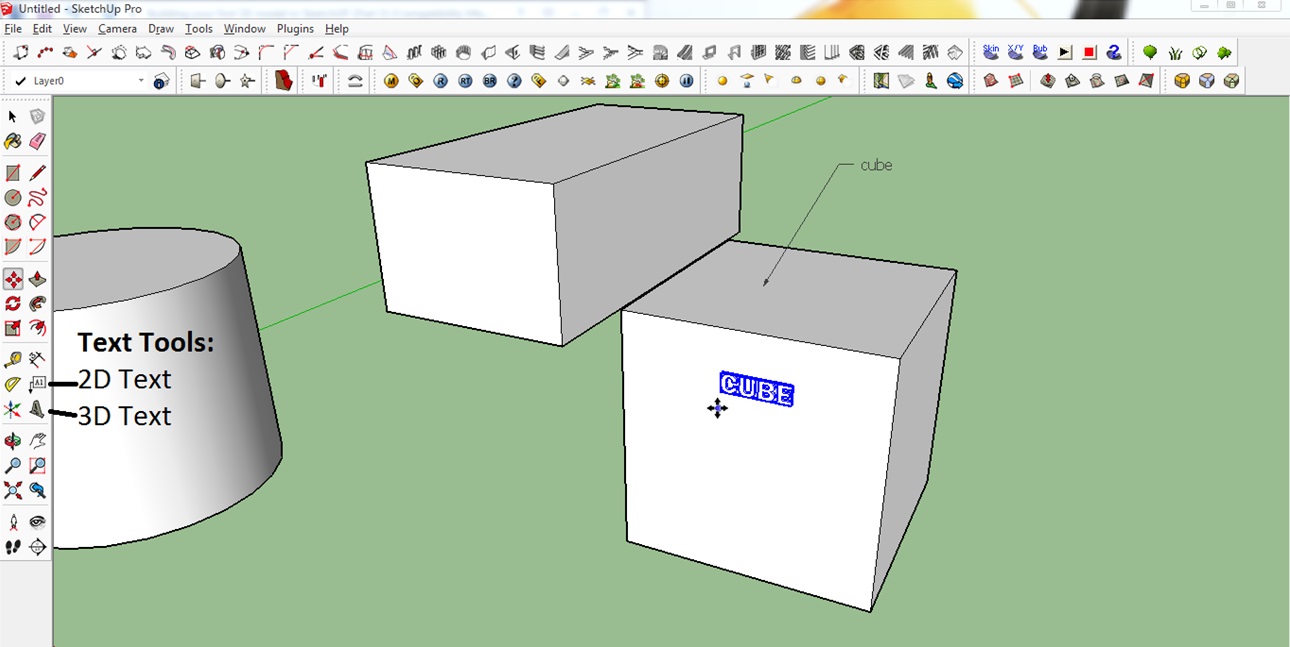
Step 13: Text
The second text tool allows y'all to calculate base areas of planes and to place labels. In the motion-picture show below it was used to characterization the object equally a 'cube'. The arrow indicates which object was labeled.
The 3D text tool actually creates the text as a 3D object that is part of your pattern. Equally ever, it makes sense to but play around with these ii tools.
Pace 14: Basic Cutting
This tool allows you to cut or eliminate a section of your model. To show yous how to use this tool, nosotros used the cylinder.
1. Click on the Penciltool in the toolbar to draw a line (we used this tool at the beginning of the tutorial)
2. For this tutorial, make a line on three points of the surface of the cylinder. Mark the first at any point on the edge of the peak surface of the cylinder. Second, make a bespeak in the center and third, brand a bespeak that aligns to the ruby centrality

3. Click on the Push/Pull tool on the toolbar
four. Click on one one-half of the top surface of the cylinder and push information technology downwards to create the cut and click to finalize
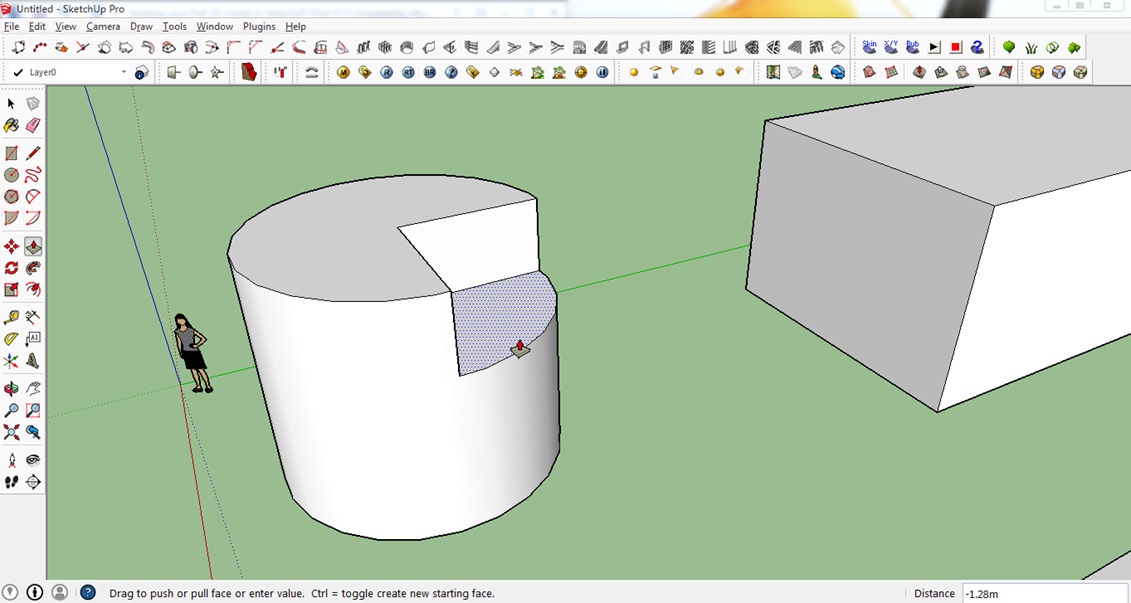
What a dainty, make clean cutting! Play around with this tool some more to discover all its functionalities.
Step 15: Cartoon an Arc
Besides lines, let'due south effort to draw with the Arc tool. It allows y'all to describe a curve. After selecting the tool, click on one of the corner points of a cube. Then click somewhere on one of its summit axes and draw an arc. Sounds complicated? It's easy once yous try it!
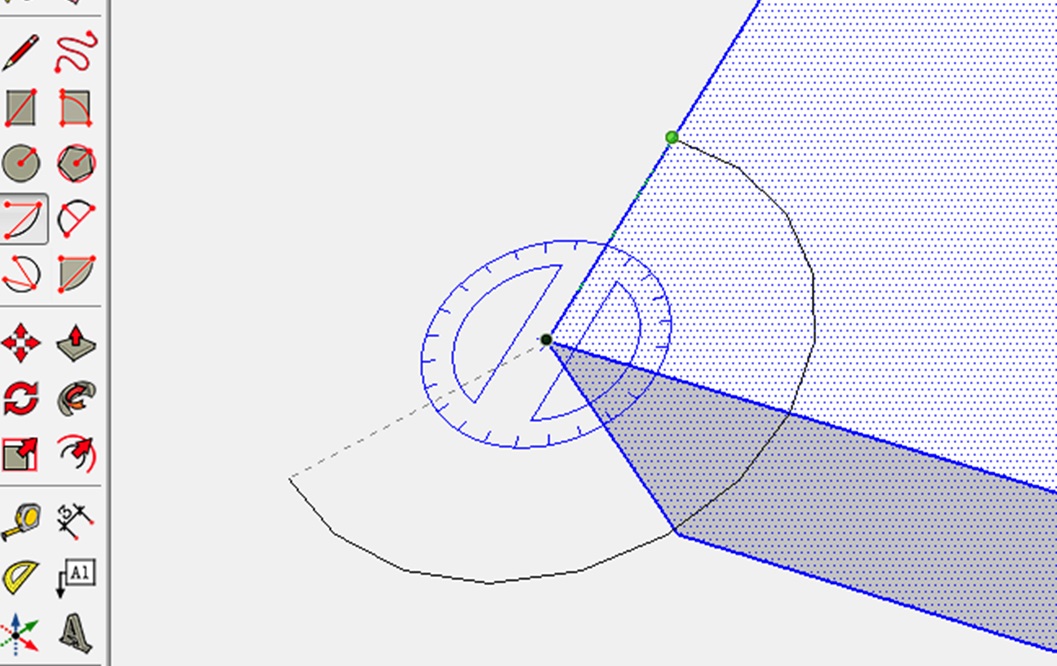
After having drawn your arc, utilize the Pull/Push tool to cut this role off.
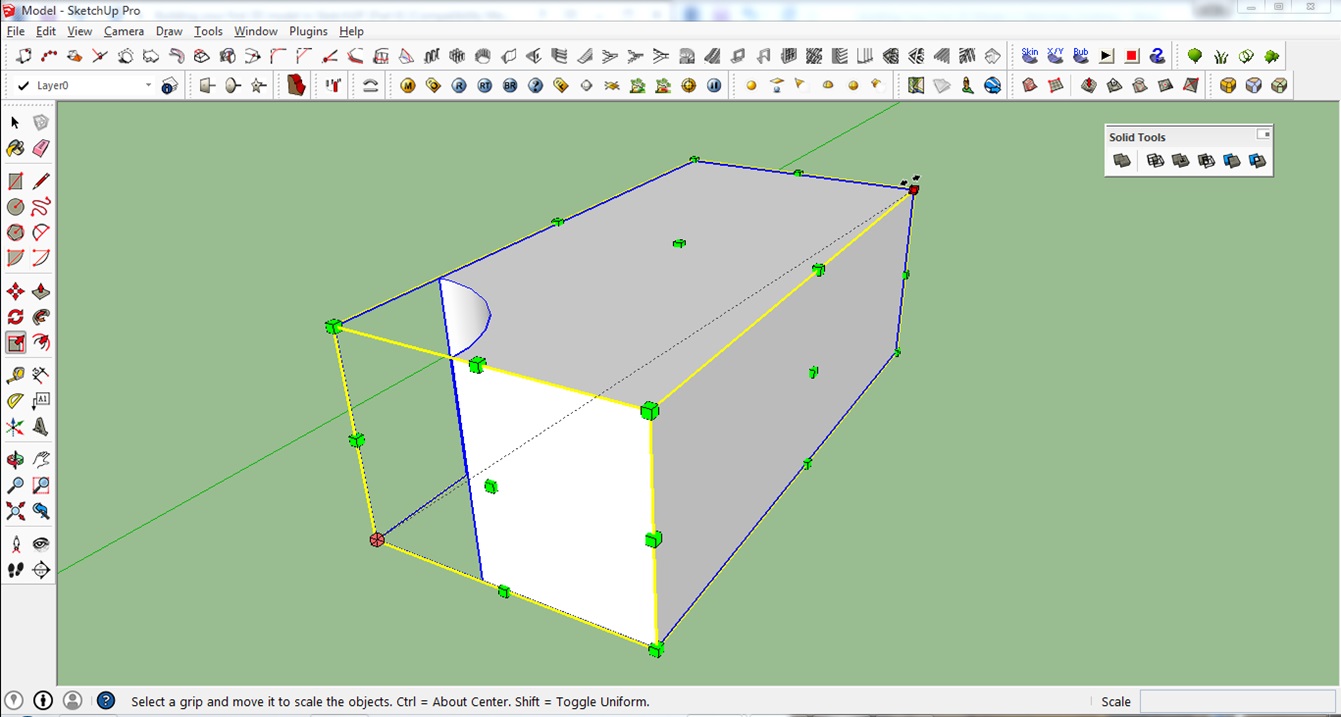
Step 16: Scaling and Stretching
This tool allows you to adjust your model accordingly or to the desired scale.
To use this tool, just select your model commencement and click on the Scale tool on the right or press Southward on your keyboard. This volition show you the different scaling points you lot tin can utilize. You can scale and stretch the object by clicking on the green dots that appear.
If you desire to calibration our model upwardly or downward while maintaining the ratio and proportion of our rectangular box (this is chosen uniform scaling) you need to click on i of the 8 corner points of the rectangular box.
You will see the value of your scaling in the lower right corner of the window. A value of 0.l ways you lot will be scaling your model down to 50%.
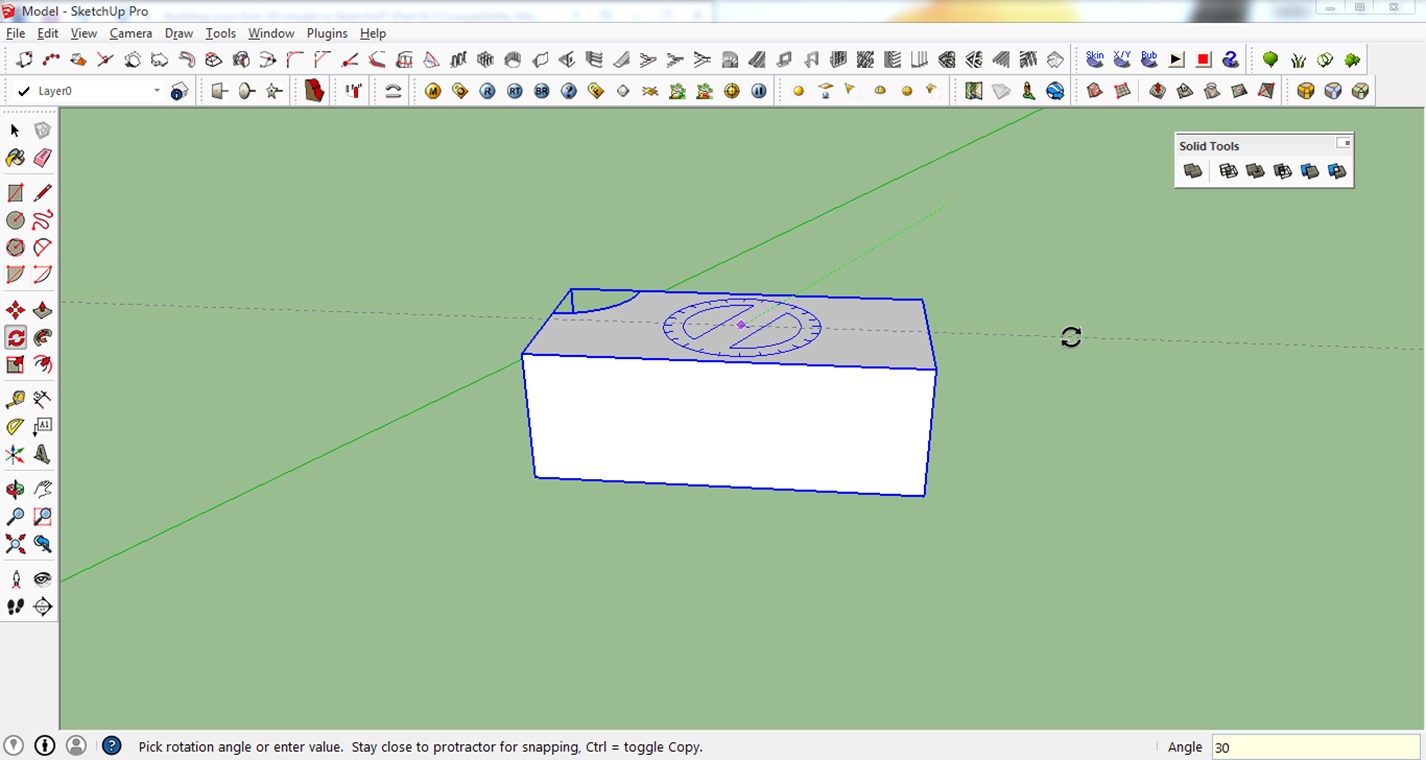
Step 17: Rotating
This characteristic is very useful when you lot experience orientation issues. This is when y'all have your model facing the contrary/wrong direction.
one. First select the model you want to rotate and select the Rotate tool or press Q on your keyboard
two. Click on the eye of the elevation surface of the rectangular box to set up your axis. Extend your cursor towards the dark-green or cherry-red axis to select the baseline of your rotation
iii. Rotate the model to the desired direction or simply input an bending value. In this instance, we entered 30°
Y ou now know 17 of import tools to get started! It's time to create your first 3D model in SketchUp yourself, and we hope yous enjoyed this tutorial by All3DP'south SketchUp expert Mich Judelag. If you want to stay up to date with all things related to 3D printing, make sure to check out All3DP's website here.
Did yous already create a 3D model in SketchUp and want to brand it 3D printable? This requires some actress steps which yous will learn in this tutorial . Once you know how to model in SketchUp and how to make your 3D model printable, you could create an amazing object such every bit Kurt Plagge's ' Articulated Cube ' .
Are you lot more than interested in elementary 3D modeling software for sculpting organic objects? So our SculptGL and Meshmixer tutorials might come in handy.
Source: https://i.materialise.com/blog/en/first-3d-model-in-sketchup-tutorial/
0 Response to "make 2d drawing from sketchup 3d model"
Post a Comment